Painting your kitchen cabinets can be a cost-effective way to give your kitchen a new and fresh look.
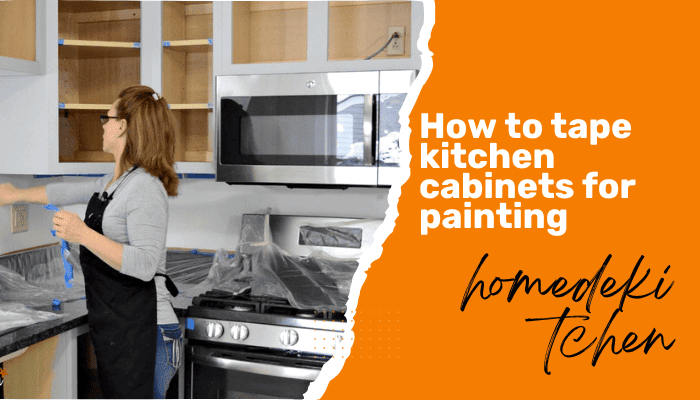
How to tape kitchen cabinets for painting, Achieving this task requires careful preparation and in this regard, the one crucial step is the process of taping. Properly taping your kitchen cabinets before painting can help you to achieve clean, align lines, and prevent paint.
By following a few steps, you can ensure that the paint stays only in the desired areas while protecting the surroundings.
In this article, we will provide you with a guide with a detailed explanation of how to tape kitchen cabinets for painting.
Ensures that you have the necessary supplies, including painter’s tape, a drop cloth or plastic sheeting, and a clean surface.
The following are the steps to help you achieve a polished and beautiful finish on your newly painted kitchen cabinets.
Summary
To tape the kitchen cabinet for painting, use painter’s tape and a level. First mark the height of the cabinet from the floor. Then measure the width of the cabinet and mark that off on the tape.
Then line up the top of the cabinet with the tape and make sure it’s level. Finally, attach the tape to the cabinet by pressing down firmly.
What causes paint to peel off cabinets?
One of the most common problems people run into when painting cabinets is paint peels off after some time. This is caused by not properly preparing the surface before painting.
If there is any dirt, grease, etc. on the cabinet, then the paint will not adhere properly and soon start peeling off. So it’s important to clean the cabinet thoroughly.
Another reason for peeling is applying the paint too thickly. And it doesn’t have time to adhere to the surface before it starts to dry properly.
Another problem that can cause paint to peel off cabinets is not allowing enough time for the paint to dry between coats. If you apply the second coat before drying out the first coat. It leads to peeling off the paint.
So be sure to allow plenty of time for the paint to dry before applying a second coat.
Why should tape cabinet before painting
There are a few reasons you should tape cabinets before painting them. The first reason is to avoid getting paint on the surface of the kitchen cabinets. This includes the inside surface as well as the hardware.
Taping off these areas will help you to ensure that only the areas that you want to be painted are actually painted.
Another reason to tape kitchen cabinets before painting them is to avoid drip and splatters. Taping off the areas around the cabinet will help to catch drips and splatters so that they don’t end up on your walls or floor.
Finally taping cabinets before painting them will help to create clean, sharp lines. When you paint without taping, it is not easy to get clean, straight lines. Taping off the edges of the cabinets will help you create sharp, clean lines that will give your cabinets a professional-looking finish.
Materials you will need
- Before you start taping, gather the following materials.
- Use the high-quality painter’s tape designed for the delicate surface to avoid damage.
- Clean, lint-free clothes or rags
- A utility knife or scissors
- A straight edge or a knife
- A ladder or step stool
- Paint and paintbrushes or roller for the cabinet doors and frames.
How to tape kitchen cabinets for painting
A step-by-step guide to taping kitchen cabinets for painting.
1. Gather your tool and material
Before you start, you will need to gather a few tools and materials. You will need painter’s tape, lint-free cloths or rags, and a screwdriver. You may also need a putty knife if your cabinets have decorative molding.
If you are not sure what type of painter tape to use, we recommend a medium adhesion tape. This type of tape will adhere well to most surfaces without causing damage.
2. Remove cabinet doors and drawers
The first step in how to tape the cabinet for painting is to remove the cabinet doors and drawers. most cabinets have screws that hold the doors and drawers in place. You need to remove this screw with a screwdriver. Once the screws are removed, the doors and draws should come right off.
3. Clean the cabinets
Once the doors and drawers are removed, it’s time to clean the cabinets. If there is any grease and dirt in the cabinet, as we can see the paint will not adhere properly and eventually start peeling.so it’s important to clear the cabinet before starting any project.
Use a mixture of mild soap and water to clean the cabinet surface thoroughly.
Then use a rag or clean cloth to wipe the cabinet with the soap and water solution. Finally, use a clean cloth to dry the cabinets completely. You can also use a degreaser if there is a lot of grease buildup.
4. Remove Hardware
The next step is to remove any hardware from the cabinet. This includes handles and knobs .most hardware attach with a screw so you need to remove the screwdriver.
5. Fill in holes and imperfections
After removing the hardware the next step you need to fill in any holes in the cabinets. This includes holes in the hardware as well as any dents or scratches. You can use wood filler to fill in these holes and imperfections.
6. Sand the cabinets
The next step is to sand the cabinets. This will help to create a smooth surface for the paint to adhere to. If you skip this step, the paint will likely not adhere properly and start peeling. First sand in the direction of the grain. Then, sand across the grain. Sand until the surface is smooth.
7. Double-check and press firmly
Inspect your taping job carefully to make sure all areas you want to protect are covered with painter’s tape. Press the tape down firmly with your fingers or a putty knife to ensure it adheres securely.
Conclusion
Taping your kitchen cabinets before painting is a crucial step in achieving a professional-looking finish
Now you can know how to tap kitchen cabinets for painting. It’s time to get started on your project. Follow these simple steps and you will be well on your way to a fresh new look for your kitchen.
FAQs!!
How Do You Tape Cabinet Doors For Painting?
To tape cabinet doors for painting, follow these steps:
- Clean the cabinets thoroughly before taping.
- Use high-quality masking tape to cover the edges and hardware of the cabinet doors.
- Press the tape firmly to ensure a tight seal.
- Apply the paint carefully, making sure to avoid the taped areas.
What type of tape should I use for taping kitchen cabinets?
Use painter tape also known as masking tape, specially designed for painting. It has less adhesive than regular tape, making it easier to remove without damaging surfaces or leaving residue.
When should I remove the tape after painting?
Remove the painter’s tape after the paint has dried completely. Refer to the paint manufacturer’s instructions for recommended drying times. but it’s typically best to wait at least 24 hours.